June 1st, 2013
Stencil Showcase Showoff!

It’s Showcase season! That time of year when local houses of interest all over the country are transformed by teams of designers and talented artisans for a brief run of walkthroughs by local interior design enthusiasts. Showcase Houses are always so fun to tour, not only because the designers pull out all the stops to impress you, but there is generally a deserving charity involved, and often the chosen homes feature fabulous architecture and features that have seen better days. Artist Crista Maree Bartholomew, based in Minneapolis, MN, recently became involved in a Showcase project near and dear to her own heart. A historic building in her hometown, the Frank P. and Anna Shepard House, was in danger of being destroyed. The home is located in the Historic Hill Heritage Preservation District, which is characterized by the largest concentration of nineteenth-century architectural examples in St. Paul, Minnesota. At the last minute, the home was rescued by a couple who planned to convert it into both a private residence and a warm and comforting destination, The Saint Paul Bed & Breakfast.
The home has now been thankfully transformed by various designers for a premier interior design event, the ASID Showcase Home. This historic 15,000 square foot brick Queen Anne Victorian mansion boasts 22 spaces, including four public suites. Prior to the renovations, the home included 13 bedrooms, 14 baths and 6 fireplaces! This building has been an icon in St. Paul and Crista was honored to be chosen to work with designers in two separate projects and we are SO THRILLED that in both areas, she incorporated stencil patterns from both Royal Design Studio and Modello® Designs. Let’s take a little tour of our own through Crista’s painted spaces….
![]()
CRAFT ROOM & LAUNDRY FLOOR
Interior designer Kristen Sheikh of Bruit de la Mode, envisioned a fresh, youthful space with a little bit of quirkiness to help inspire creativity. She designed separate “zones”: the Laundry Room, Craft and Sewing space and a special area with access to the roof. Challenged by the small room with three angled walls, Sheikh embraced the uniqueness of the space and its fantastic window feature. Crista was able to connect the spaces visually (and dramatically!) by stenciling the floor with a bold black and white chevron pattern.
![]()
She used the large Modern Chevron Wall Stencil from the Allover Modern Stencils Collection in a two-tone finish. The floor is original to the home and was very uneven with wavy boards so when so after completing the bulk of the pattern with the stencil, she cut in to the edges using tape, and finished the work by hand. Now, who wouldn’t love to have a craft room like this?!
![]()
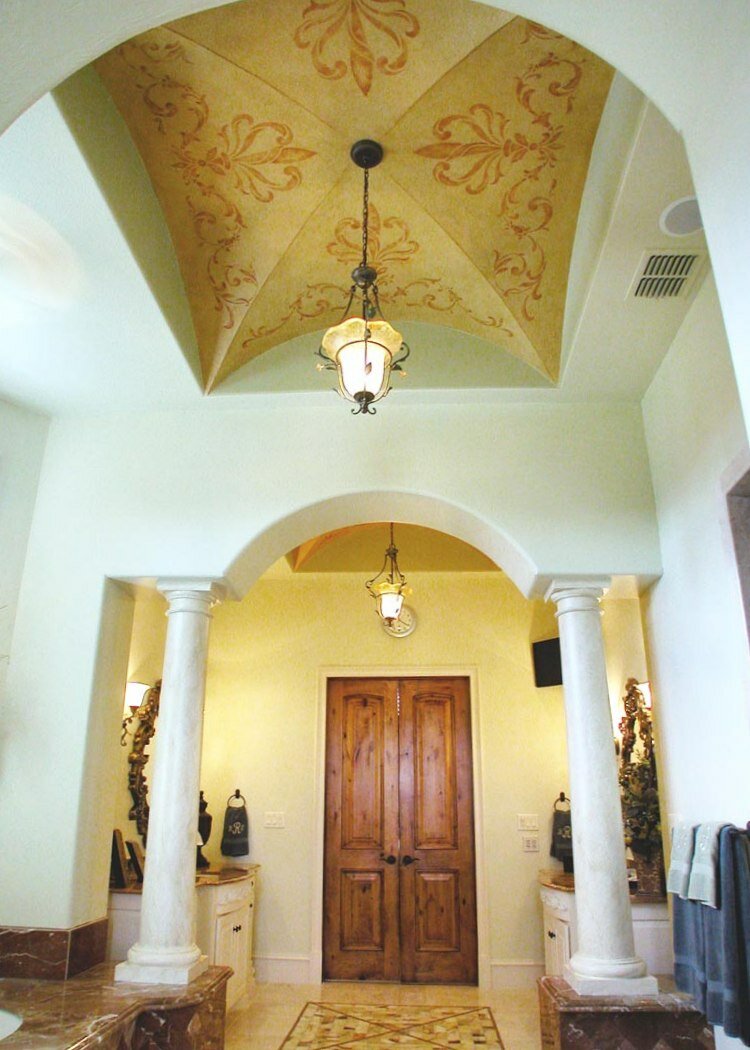
PARLOR
The Parlor is a comfortable space where guests of the Bed & Breakfast can relax in multiple seating areas near the fireplace. The designer, Karen Soojian of KSID Studio, LLC, selected a fresh, modern palette of white and off-whites with splashes of aqua to infuse the room with light, while warm cognac and sienna tones retain the elegance and honor the storied history of the home.

The parlor walls are treated with Crista’s hand-tied Linen Plaster finish, which creates a subtle yet stunning backdrop for the Contempo Trellis Stencil from Royal Design Studio which she stenciled over the plaster in a subtle two-color palette.

The gorgeous paneled ceiling becomes even MORE gorgeous with the addition of a large-scale decorative pattern. This is a Modello® Designs masking stencil, designed especially for this special space. It features five colors with metallic influences that coordinate beautifully with the wall stenciling, drapery and up0holstery fabrics.

The seemingly effortless mix of old, historic architecture and contemporary stencil patterns and design details works so beautifully here, it makes me long to see the rest of the house! This ASID Showcase Home will be open to the public in St. Paul, Minnesota, through June 9th, 2013 with The Saint Paul Bed & Breakfast officially opening on August 1, 2013.
You can find more of Crista’s beautiful work on her company website, Crista Maree, as well as her Facebook fan page. We hope you’ve been inspired by her incredible use of stencils, finishes and color combinations! If you’d like even more inspiration, be sure to stop by our Royal Design Studio/Modello Designs Facebook fan page, Pinterest boards and Twitter stream for daily doses of pattern and design ideas!
January 22nd, 2013
Stencil Star: Kathy Wear
Our customers are ALWAYS finding new and creative ways to combine decorative paint techniques with ornamental patterns and stencil designs on unique surfaces. We like to applaud these innovative artists in our Stencil Star™ series, which seeks to showcase creative artists worldwide and their inspired work. Today we feature the fun and lively Kathy Wear of Artistic Finishes in Tennessee!

ABOUT KATHY WEAR
Kathy Wear is the owner of Artistic Finishes in Tennessee. Artistic Finishes specializes in custom wall finishes and hand troweled plasters as well as murals and decorative concrete. Kathy has won numerous awards over the last 10 years including six awards for Best Faux Finish from the Middle Tennessee Builders Association for her work in the Parade of Homes. She was recently named one of the top three decorative concrete artists in Nashville. Her work has also been published in many local and national publications and also been featured on Southern Homes and Lifestyles TV.

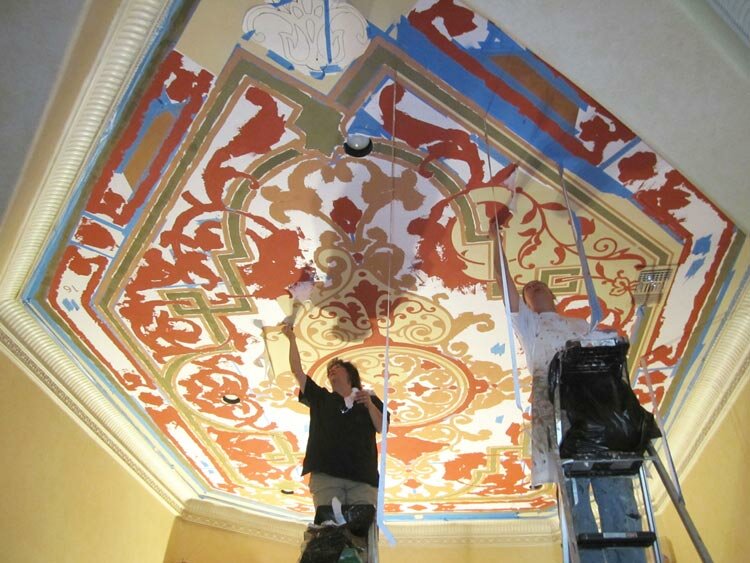
Fabulous ceiling she stenciled with a custom Modello™ Designs stencil pattern and a great color scheme!
What draws you to Stenciling?
I am drawn to stenciling because I can really customize the work I do for my clients as I try to never do the same finish twice. My clients love the fact that they have something unique to their home. Over the past few years I have done many stenciled ceilings and more recently I have done quite a few floors. Doing a stenciled ceiling or floor can add a very dramatic focal point to a room and turn a plain space into something fabulous.

Kathy creates Custom Commodes™ for her clients which use metallic foils and leaf combined with our Modello™ Designs vinyl stencils!
How does Stenciling enhance your creative business?
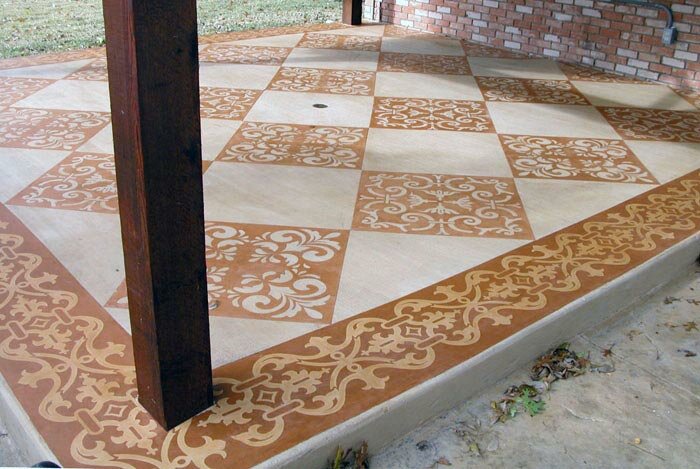
What I love about stenciling and using Modello® Designs masking stencils is that I can talk with my clients and designers and get a sense of what they are looking for in the space and then create a drawing and send it to the Modello team. They customize it into a beautiful work of art and I use this to create exactly what my client wants. The last floor project I completed was a joy to work on! I worked with Melissa at Modello Designs to do a large custom border stencil on a very irregular shaped alter floor and it fit like a dream.

This stunning faux marble floor was created with a concrete overlay, one of our Modello™ Designs Ornamental Tile vinyl stencil designs (OrnTil180) for the large center element and additional custom designs.
Please share your top Stenciling Tips with us.
My top tips for stenciling are, number one DON’T be intimidated!! It is not hard to do. Once you get in the swing of things it progresses very quickly. If you are using a Modello® Designs masking stencil, be sure to have you measurements correct. If you get these right, your stencil should lay down quite easily. Any small gaps or errors that may occur can quickly be corrected by a bit of blue tape. If I don’t personally prepare my substrate, I always roll on a quick coat of Guardz as this way I can be assured that the stencil will pull off quickly and cleanly. A second pair of hands and eyes is always helpful when laying the stencil. So, try it! My favorite part of all is when I pull the stencil and reveal the beautiful design!

Kathy is no stranger to glam, custom works! You can see her unique treatment above with an Ornamental Stencil border (OrnBor125) around a niche and below with a canvas created with a Modello™ Designs vinyl motif stencil from our Art Deco Collection (DecMot120).

We hope you’ve enjoyed seeing Kathy’s beautiful work and inspiring creativity with both our Royal Design Studio stencils and Modello® Designs masking patterns! You can find more of her work in her Artistic Finishes website! If you’d like continued inspiration, don’t forget to visit our Pinterest boards filled with design, pattern and finish ideas and our Facebook fan page for stencil projects and more!
September 6th, 2012
Stencil Star: Bernadette Forese
The love of patterns and stencil designs coupled with beautiful decorative paint treatments have led us to discover many creative artists worldwide. Our Stencil Star™ series seeks to showcase these artists and feature their beautiful work. This week we travel to Pennsylvania to see and learn about a few lovely spaces created by Bernadette Forese of The Faux Pro.

Bernadette Forese
ABOUT THE FAUX PRO
Bernadette Forese is the owner and founder of The Faux Pro, LLC and Philadelphia Gilding, both based in Kennett Square, Pennsylvania. She has a BS degree in Business Management and received professional faux and decorative arts training from international master artists in studios around the world. Her work has been showcased in design homes and in national design magazines. Bernadette opened her business in 2002 and she recognized early on the importance of incorporating pattern and style in to the design. She relies heavily on her ability to understand the spatial relationship between form, function and purpose of each space. Bernadette primarily works on entire homes, large-scale commercial and church projects and brings in her talented crew to assist with them. Although her business is based in Pennsylvania, she travels the country to her client’s homes and businesses.

Bernadette was at an Art of Living event where Barb Skivington and I taught a reverse gilded glass finish. Here, she uses the technique on a gorgeous tabletop with a Modello™ Designs Ornamental Border vinyl stencil (OrnBor147). The how-to for this verre eglomise techniqueis available in the Art of Living book.
How do you determine what patterns will work for a project?
Sometimes there are so many pattern options that the choices can be overwhelming. When determining what pattern will look great in a space, I take many things in to consideration. What is the function of the space? Formal entertainment, casual elegance, etc. What is the natural light in the space and when does it hit? How tall are the ceilings? Is this a commercial space or residential space? And, most importantly, what is the design dilemma that we’re trying to solve? For example, if there are two chandeliers over one large kitchen island, then unifying them with a pattern on the ceiling brings the whole space together. I look through many magazines to get inspiration for pattern but, to be honest, I rely on following Melanie Royals’ blog and her other social media sites for inspiration. I look at the scale of my project and project what different patterns would look like.

A spectacular kitchen with the design dilemma of unifying double chandeliers in one space. Bernadette used two Modello™ Design Ornamental Center vinyl stencil patterns (OrnCen187) to connect and bring the space together! Composite gold and aluminum leaf were used to stencil in the patterns.
Please share your top Stenciling tip with us.
Spray Adhesive or water in a spray bottle! If I’m stenciling with paints, many times I won’t use any spray adhesive; just tape to keep the stencil in place and an off-loaded foam roller. However, sometimes if I’m getting bleed through I’ll grab my water bottle and spray the back of the stencil (just a mist) and the stencil will stay put on the wall! If I’m doing a texture through the stencil, however, I’ll use spray adhesive (3M Super 77) every time. And then Simple Green is one of my best friends; it removes everything that gets stuck to the stencil!

(above) The Pear and Plum Botanical Fruit stencil used in elegant, traditional setting. You can see the close-up of the stencil on the right hand side. This was another project that Bernie worked on with us at the Art of Living event. (below) The interior designer on the project, June Shea of Shea Studio Interiors, chose the Elegancia Allover wall stencil in a 2-story residential entryway gracing all the walls perfectly. Composition gold Schabin leaf was used to stencil the design and then waxed to seal it with the blue wall color coming through the broken leaf.

What are your favorite surfaces to work on and design for?
I actually love working on floors and ceilings. Of course walls are fantastic, too! However, applying stenciled pattern to the floor is creative and fun and, when done properly in conjunction with a flooring company, has the longevity and durability of any hardwood floor because the pattern and paints are nestled under the layers of protective topcoat from the flooring company. Ceilings, too, are great spaces! They’re perfect, in my opinion, because they don’t have the traditional interruptions (door frames, window frames, etc) that normal walls have so the pattern can flow uninterrupted.

Custom Modello™ Designs vinyl stencils were used to create the illusion of a rug on the flooring in a residence (above) and incorporate a client’s logo in a commercial lobby (below).

We hope you’ve enjoyed seeing the lovely stencil work of Bernadette Forese and I want to second those tips on using spray adhesive and Simple Green to clean your stencils! Be sure to visit both her websites, The Faux Pro, LLC and Philadelphia Gilding, to see many more of her projects. She also has a Facebook page where she shares the work of both her studios.
Do be sure to follow us on Facebook to see our fresh and daily stencil and creative inspirations as well as follow us on Pinterest to preview all our fave images incorporating pattern, design and color. We would LOVE for you keep the inspiration flowing and to pin or share these pics with your friends and followers!
August 23rd, 2012
Stencil Stars: Bella Tucker
Hey Y’all! Are you ready for another Stencil Star showcase? We visit Nashville this week to meet with Dana & Brooks Tucker of Bella Tucker Decorative Finishes. Dana & Brooks are a husband and wife team that are perfectly matched — he oversees the projects and she runs the marketing and management of the business. It’s this teamwork that translates beautifully to the creation of outstanding decorative painting projects and inspired applications of stencil design and patterns.

Dana & Brooks Tucker
ABOUT BELLA TUCKER
Bella Tucker Decorative Finishes is based just outside of Nashville in Franklin, TN. It is a collaborative partnership of husband and wife team, Brooks (artist) and Dana Tucker. Brooks is a 6th generation Texan who was born into a Navy family. He has lived all over the world including two moves to Italy. It was in Europe that he developed a love of texture, color and decorative paint treatments. In 1997, he moved to Nashville with Dana, and after seeing the incredible finishes they were creating for their own home, family and friends starting requesting Brooks to paint for them as well. They launched their business in 2006 and since then, have received many accolades as well as being chosen for a feature in the Nashville Southern Living Showcase Home.

The Chez Sheik stencil from the Allover Moroccan Collection makes a gorgeous impression when walking into the powder bath (above). Our easy to use Smoked Oyster Stencil Creme was chosen to stencil the pattern with a lustrous sheen.
What draws you to Stenciling?
We were initially drawn to stenciling as a way to modernize our portfolio and stay on-point with design trends. We were getting a lot of feedback from designers that no one was asking for faux finishes any more. Once we could show them modern applications of faux finishes using graphic stencil patterns, the tide turned. Now, we keep a pretty full pipeline of projects with a lot of designers and clients requesting stencils.

Our Contempo Wall Trellis stencil is a relatively new pattern in our Allover Modern Collection and used within a wonderful neutral scheme above. The interior design is by Julie Couch Interiors and the photo is courtesy of photographer Caroline Allison.
How do you determine which pattern will work for your project?
Pattern is so personal. It really takes walking through a client’s space and getting a feel for their style. What helps us narrow down pattern more than anything is Pinterest. I always keep active boards and I ask my clients to either send me photos of patterns they like, or comment on the Bella Tucker Pinterest account. Royal Design Studio has an amazing website, too. My clients love to get on there and spend hours looking at the stencil design options.

Bella Tucker uses great stencil patterns for ceilings to flooring and every surface in between! Our Skylar’s Lace Floral stencil was chosen by designer Julie Couch and is perfectly paired with the beautiful light fixture above. Photo by Caroline Allison. A custom Ikat Chevron Modello™ Designs vinyl stencil pattern is used with the Skimstone concrete floor below. The beautiful exterior patio was part of the Nashville Southern Living Showcase Home.

How does Stenciling enhance your creative business?
We were originally drawn to stenciling because we are always try to stay on top of current design trends. We were seeing a lot of graphic patterns in the shelter magazines and we knew that we could work with that concept but extend it to be more artistic and one of a kind while completely customizing the color, texture and pattern for each specific project.

Dana & Brooks had a fun personal project with a re-purposed vintage headboard, above. They made a “welcome” sign for their front porch using our Chevron Furniture stencil and Annie Sloan Chalk Paint™. Below, a photo by Caroline Allison shows our Uzbek Suzani stencil gracefully enhancing a guest bedroom. Designer Julie Couch worked with Bella Tucker to create a beautiful and serene guest bedroom.

Dana and Brooks are an engaging couple and a GREAT team! We love how each design here is done in an neutral palette, but with a fresh, fun twist that makes their finishes anything but boring. We appreciate their sharing their stencil thoughts with us! Keep up with Bella Tucker by visiting their their website, Bella Tucker Decorative Finishes, and watch their Facebook page for frequent project updates.
Don’t miss a pretty pattern opportunity!! Be sure to follow us on Facebook AND follow us on Pinterest to receive the fresh and creative inspirations and projects we share daily! Don’t forget to pin these wonderful images too-BIG hint!
Our weekly series on Stencil Stars™ showcases our customer’s use of our Royal Design Studio mylar wall stencils and Modello™ masking stencils on walls, ceilings, floors, and more.
August 17th, 2012
Protected: Rocking the Stencil!
May 21st, 2012
Artisan Studio Design
Today begins a new weekly series on Stencil Stars™ where we showcase our customer’s use of our mylar wall stencils and Modello™ masking stencils on walls, ceilings, floors, and more. Each week we will feature a different decorative artist (or decorative studio!) whose work with our stencils excites and inspires us, with the hope that YOU will be inspired too! Look forward to interesting pattern combos and color palettes, pro painting tips and ideas, and even the stories behind the stenciling. I’ll be co-writing this series with a BIG assist from my friend Regina Garay of Fauxology and SociaComm fame. Regina is officially helping us with our creative outreach to artists and bloggers and is a great asset and ambassador!
Our inagural Stencil Stars are…. paint buds and business partners Brooke Johnson and Jann Krone of Artisan Studio Design

Brooke Johnson and Jann Krone
A Bit about Artisan Studio Design
A true passion for beautiful spaces led Texas-based Brooke and Jann out of *yawn* jobs in the corporate world into a creative one where both could fulfill their dreams and passion. They met at a seminar and became fast friends, then business partners, finding that by combining their respective talents they are able to offer their clients a much more comprehensive portfolio to choose from. Each has been extensively trained by Texturline of Canada, Safra from Italy, Faux Effects products, Modello Designs Stencils and Tattoowall, to name a few. Their passion, dreams and creativity can be seen in private residences, commercial buildings, corporate offices, design showcase events and numerous parade/dream homes. Collectively they have won various awards and have been interviewed both for radio, newspaper, magazines and books. Today we have a chance to delve into the details of their work and get some insights on their creative process.
![]()
The stunning, dramatic black & white bath above is created by using Modello Transitional Border Stencil 110
Brooke and Jann are accomplished using traditional stencils, like those we sell through Royal Design Studio. Most of the work featured here, however, focuses on their use of Modello Decorative Masking Stencils. These are one-time-use, adhesive backed vinyl stencils that allow for easy custom design and intricate, large-scale patterns. They have become the “go-to tool” for professional decorative finishers when pattern becomes a priority. Masking stencils offer many advantages. One of which is that the pattern can be worked using either the positive or negative image. We have capitalized on this by creating a collection of Transitional Border patterns, that allow you to “transition” from one color to another with the help of the pattern itself. Here are three prime examples of these in use by Artisan Studio Design.

An alternate use of this same Modello™ stencil pattern where Brooke and Jann provided perfect measurements so that our custom design department could fit the pattern to a tee by manipulating the design elements slightly so that each corner is beautifully finished.

A different Transitional border stencil, 113, was used to create a two-tone stencil effect in a bathroom higher up on the wall.
The beautiful groin ceiling above was done with a Royal Design Studio custom stencil to Artisan Studio Design’s specifications. It really enhances and accentuates the area while balancing out the color scheme.
Now, some questions for Artisan Design Studio…..
What draws you to Stenciling?
The ability to create without limitations. Using traditional mylar stencils and Modello custom masking stencils allow us the ability to enhance ANY surface. We have used them on concrete floors, walls, furniture, niches, cabinets, crown moldings, ceilings and mirrors. Our mediums have included paint, plaster, glass beads and concrete. The impact even using a small stencil image can make the difference between a nice finish and an extraordinary finish.
A patio floor is transformed from blah to wow! using a well-designed pattern and warm colors.
How do you determine which pattern will work for your project?
We love this question! One of our requirements in designing for any client is that we must visit the space where we will be creating a design. We feel the areas that we create should evoke a feeling of well-being and reflect our client’s personality and wishes. To achieve that goal we spend time with our clients, asking questions, reviewing the architecture and discussing the purpose of the space so we have a clear picture of what needs to be accomplished. To do that, you have to come to know your client well. Every client is different, so we approach every project with an open mind taking into account the clients requests and desires.
In getting to know our client, we have found that certain personalities such as accountants, architects, doctors and professional athletes tend to go for a more of a grid format, whether they realize it or not. Professions that aren’t as structured tend to prefer a looser, more free-flowing pattern such as more random placement and more eclectic. It is the ability to read people and their spaces that has given us an advantage in picking patterns and how they are laid out and the client isn’t any wiser. They just like the fact that it “works” and is perfect for them.
Jann and Brooke at work on a very large ceiling stencil project that required some serious custom designing to fit the “boat” shaped recessed area. The end result (below) showcases the finished customized Modello Chateau Carpet Panel — which translates beautifully to ceilings as well as floors!

Please share your top stenciling tips with us.
When working on a light or white background, we use the low-tack gray Modello™ masking material. This is especially useful when you are hand-painting your design. When using Modello™ stencil patterns or mylar stencils, you can never measure too many times, especially on groin vaults. We have found that there is NO such thing as a perfectly straight or square room and no two sides are ever exactly the same measurement. Measure, measure and measure again.
We had a situation in a powder bath that had an arched wall that separated the sink from the toilet area. The pattern the designer requested was a trellis pattern. The challenge for us was to have the pattern on the forward wall of the arch MATCH the pattern on the back wall when you walked in, so there was no break in the visual effect. This was a prime example of measuring the area and matching it to the size of the stencil we needed.
Another tip is to always buy more then one stencil or purchase a small stencil that matches the production size stencil. We have found these extra stencils come in handy especially if you have to cut them up to make your design work. Last, we always have a large pad of newsprint when we are stenciling. It is an inexpensive pad from any hobby store that we can quickly wipe down, clean our stencils on and throw away the used paper. The newsprint also comes in handy when we need to spray adhesive on the stencils. We always keep a spray bottle of Simple Green with us to wipe down the stencils, too.
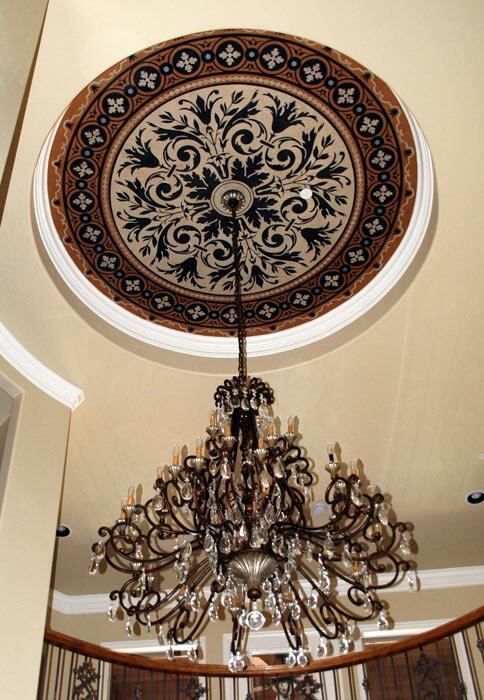
Architectural elements such as inset niches and ceilings can become wonderful focal points. This ceiling features Modello Ornamental Center 128.
We hope you’ve enjoyed seeing the work of our first Stencil Stars! We’re so happy that Brooke and Jann have found the perfect partnership in each other and incorporating pattern into their many projects. We have SO MANY fabulously talented customers, you can rest assured that we have many more posts on the way. Special note: You can see a preview of each week’s Stencil Star each Saturday on our Royal Design Studio/Modello Designs Facebook Page. You can find more of Brooke and Jann’s work on their website, Artisan Design Studio and their Facebook page.
May 8th, 2012
Marrakesh by Design
It’s been a long and colorful journey for my friend Maryam and her husband Chris to realize their vision for their “built from the ground up” boutique hotel, Peacock Pavilions, in an olive grove just outside of Marrakesh.

A journey that has been well-told and documented on Maryam’s award winning blog, My Marrakesh. After meeting online, I’ve had the pleasure of collaborating with Chris and Maryam on multiple painting projects at Peacock Pavilions that have turned into leading American artisans on almost annual painting adventures to this lovely place. It’s been such a joy to see the transformation of PP from a muddy construction site to a beautiful oasis, and also to see Maryam’s transformation from a budding blogger with a dream to an accomplished photographer, international design star, Moroccan decorating expert, and now published author!

Just last month, the family home at Peacock Pavilions was featured in none other than Elle Decor! What a thrill to see the Art Deco mural I had designed for a guest room featured in all its full-page spendor!

Not to mention, the master bedroom floor stenciled with lovely Skylar’s Lace!

Now just this week, Marrakesh by Design, is hitting the bookstores and Maryam is on her official American Book Tour, which just so happens to be making a special stop at our San Diego Studio this coming Saturday May 12th!! If you are in the Southern California area you won’t want to miss this Moroccan Decorating Event and book signing opportunity. Besides a design talk, we have some special treats planned, including a Peacock Feather stencil to take home, a Moroccan themed stencil project, a henna tattoo artist and other goodies. Please do check it out as we are looking forward to bringing a touch of Morocco-and Maryam- to San Diego!
March 28th, 2012
New Stencil Site Has Arrived!
It’s HERE! After months, years really, we have our new Royal Design Studio stencil website to unveil. Actually, it’s a Royal Design Studio stencil website 2.0, because we’ve taken the leap to putting multiple sites within a site. There is still a lot of work to do and much to add (isn’t there always???) but we have started off with our stencil site, seen below, and a new site called Paint and Create (more on that later)!

Leading off is Royal Design Studio-the original stencil business I founded in 1994. It still looks pretty fresh, doesn’t it? Kind of like me. *cough*. The primary feature of this site is our stencil collection, of course, and we have done some fluffing up by adding cool, new graphics and reorganizing our stencils into new, more logical categories.

For instance, we broken down our Allover Damask Stencils into subcategories like Allover Floral Stencils, Allover Moroccan Stencils, Allover Modern Stencils, etc. so it’s easier to pinpoint that perfect stencil for your feature wall!

Furniture painting is uber-hot right now. Actually, it’s been popular 4ever and we’ve always had a wide range of stencil patterns for furniture painting. Difference is-now they are easy to find all in one place.

Want to create a global vibe with wall stencils? In addition to our popular moroccan stencils, we have categories for Japanese Stencils, African Stencils, Indian Stencils and more.

Another new category on the site is Children’s and Nursery Stencils. My very first attempt at stenciling was back in 1984 when I stenciled my son’s nursery with a border of my own design of ducks, hearts, and rocking horses. Alas, you won’t find THAT design here, but there are lots of cute floral stencils and lots more fun designs in the works.

Your notice that there are now tabs at the top of the site that lead to different areas. Some of these are still in progress, but we have finished up our new decorative painting site Paint and Create. This is where you will find all the cool tools and decorative painting products that you can use alone or combine with our stencil and Modello Designs masking patterns.

Of course, we are super happy to be carrying the full line of the amazing Annie Sloan Chalk Paint. This is the ORIGINAL Chalk Paint™, developed by Annie Sloan 20 years ago in England as the ultimate furniture paint.

Almost from the beginning of my stencil career, I have used stencils in combination with decorative and faux finishes. I find it so much more interesting to combine pattern with glazes, crackles, metallics and textures and you can look for lots of information on how you can too now and in the future in our Paint How-tos and Tips area.

Speaking of metallics, we have a whole section devoted just to Metallic Paint, Metal Leaf and Metallic Foil. Here’s a way to indulge in all of your gilty pleasures without an ounce of guilt! Who doesn’t want and need a little more sparkle in their life?
OK, that’s just a little peek into the new site. It’s still a bit of a work in progress and I will be sharing more in the coming days, but please check it out and browse around for yourself and let me know what you think and what more you’d like to see!
January 10th, 2012
Floorcloth Fancy
I created a stenciled vinyl floorcloth using Annie Sloan Chalk Paint recently for a booth display that got rave reviews so thought it would make a good step-by-step tutorial to share!

Stenciled floorcloths (sometimes referred to as oil cloths or floor canvases) have a long history of use in both England and the United States. Often made from recycled canvas ship sails, painted and stenciled floorcloths offered a less expensive and more hygienic alternative to carpeting and were used extensively in homes both grand and common prior to the invention of linoleum. Most modern day floorcloths are still made from heavy canvas, which requires priming, stretching, and hemming. As I was looking for a quick and easy alternative-fast-I turned to another modern option: flooring sheet vinyl!

Now, as you know, sheet vinyl comes in many different colors and patterns including brick, tile, and more. Because I wanted a nice smooth surface and blank canvas for my floorcloth, I chose a roll of sheet vinyl that had a smooth, felt-type backing and painted on THE BACK side. NOTE! I just purchased a very inexpensive, thin vinyl that was pre-cut and prepackaged for my trade show floor, but if you are doing this for yourself I highly recommend that you go with a much thicker, harder, and better quality vinyl.

After applying a coat of white primer and allowing that to dry, I rolled on two coats of Graphite Chalk Paint. Now, you could use any latex and/or acrylic paint for a floorcloth. I happened to choose Chalk Paint because
- I love it, and
- I was showcasing Chalk Paint in my booth!
I found it super easy to use on this large scale and quite ideal for stenciling! I LOVE combining complimentary stencil patterns on a project and this large 8′ x 10′ surface provided lots of space to be creative! I decided that I would use our Large Eastern Lattice stencil as the centerpiece and frame it with the Classical Border and Corner stencil. For a lacy scalloped edge, I chose the Florentine Damask stencil, with plans to just have the bottom portion of it coming off the linear border. When picking patterns to go together, I generally look for ones that offer a variety of scale but also contain unifying elements. To my eye, the lattice pattern has a petal effect that is echoed in the border pattern. The border pattern has some small dots in it which are echoed in the damask pattern. Works for me!

For a color palette, I chose Old White and Duck Egg Blue over the Graphite. I think that the addition of the Graphite with these soft, classic colors adds a little big of a fresh modern edge.

The first step was to determine where to place the Classical Border and Corner “frame”. Since the Eastern Lattice stencil is a symmetrical allover pattern, I knew that that could be repeated as much or as little as needed, but I HAD to determine how much space to leave at the edge for my Florentine Damask “lace edge” on my 8′ by 10′ floorcloth. We then measured 14.5″ in from the edge, made tick marks with a chalk pencil and ran tape on the outside of those marks. Then we measured in 4″ from there (enough to accomodate the border design and ran tape on the inside of those marks to leave a 4″ opening between the strips of tape.

We burnished the tape well and rolled on two coats of Old White Chalk Paint with a short-nap 4″ roller (not shown). When dry, we used a translucent tape to overlap just inside the frame. This was placed at roughly the width of the lines of the lattice stencil to preserve a nice black outline there. If you don’t have a similar tape you could mark lines and use blue or green painter’s tape.

Now to the stenciling! We measured to locate the center of our large inner rectangle and centered one of the cloverleaf elements over it. This ensures that your symmetrical pattern will end the same at opposite edges. I used our new larger 2″ stencil brush to stencil the whole design first with Old White Chalk Paint. The Chalk Paint covers very well, but it did take two passes to get full coverage with the white. Fortunately, the Chalk Paint dries SO quickly that you can go immediately back over it. This isn’t possible with latex paint-you must let the first coat dry so you don’t lift it off by going back over it too quickly. Of course, I used a dry-brush method with the brush, meaning I dipped just the tips of the bristles into the paint and offload a bit onto paper towels before stenciling.

The Duck Egg Blue color was then stenciled right over the Old White, JUST in selected areas of the design. In order to avoid the hassle of taping off the pattern to isolate this area, I simply switched to a smaller, 3/4″ brush which allows for more control. You just have to be careful as you near the edges to keep the bristles from creeping in the areas you want to remain white.

After a few repeats like THAT I decided to try for a speedier method. The dry brushed method looked fabulous, but I was in a time crunch, as always! I switched to a roller/brush combo that worked quite well with the Chalk Paint! After offloading the roller slightly (again on paper towels) I used a light pressure to roll the wet paint onto a portion of the stencil repeat.

Then, while the paint was still wet, I used the brush to smooth and swirl it out on the surface for the first layer. This was definitely faster, but I did have some paint seepage here and there which I touched up easily with Graphite at the end. Once I switched to this technique I just continued on doing all the white and then went back and replaced the stencil to apply the blue.

Next up! The stenciled border. The Classical Border and Corner stencil is perfect for this because it comes with a corner tile piece that gets stenciled in the corners and the border design can simply run in between. These were visually centered in the corner area and stenciled in the Graphite Chalk Paint again.

To finish off the border with a nice clean edge, simply use the edge of the corner piece to mask off and protect the area, leaving a nice open space that mimics the stencil “bridges”.

The border design was centered in the space between the corners (simply mark the center point and place a central element right over it) and then stencil with the repeat until you hit the corner. This way, your design will naturally end at the same point on opposite corners.

I wanted to bring a bit of the Duck Egg Blue Chalk Paint color into the border pattern so used a dry-brush technique to shade it just around the outer edges of the flower petals.

Voila!

For the lacy edge, I positioned the Florentine Damask stencil at the same point each time. Notice that tape was placed over the border area to protect it from having Old White paint creeping into the black parts of that design.

I began by stenciling on either side of the corner first and dry-brushed on two quick layers of Old White Chalk Paint. Once I had my corners done, I spaced the damask repeats out equally along each side between the corners. On the long edges I was able to stencil 5 repeats total, and 4 repeats total along the short edges. How much space you will have will depend on the size of your floorcloth and it’s best to measure plot it out on paper beforehand if you are doing a different size than our 8′ x 10′.

I could have left the corners as is, but wanted to add a little more detail, so I flipped the stencil around and played with it till I found a nice “fit”. Then I isolated that area with painter’s tape and stenciled in the finishing touch!


Happiness! I love this combination of colors and patterns, which would also look super fab on a ceiling or tablecloth, I think. To protect my lovely floorcloth I used two thin coats of Annie Sloan Lacquer. This is a matte, water-borne finish that is designed to work with the Chalk Paint-particularly over concrete floor surfaces. It is very thin, and penetrates the paint surface to provide a highly durable finish.

It was quite dirty after being walked on at the Home Show, and I was able to clean it up nicely with a Mr. Clean Magic Eraser without any ill effects to the paint finish! Unfortunately the cheap, thin vinyl did get some tears in it here and there. Like I said above….buy good, thick, vinyl-or paint directly on your floor or traditional floorcloth canvas-available here! For another cool idea for a hand painted vinyl floorcloth, check out this Pinterest pin!
I hope you enjoyed this floorcloth idea and tutorial! Let me know….
November 7th, 2011
Stencils Just Floor Me!
So, I’ve been doing this stencil thing for a long time now. A. really. long. time. You would think I would be bored with it by now. I mean really, how could a person continue to be excited about a simple piece of plastic with some pretty shapes cut into it?! Well the answer is, silly, it’s NOT about the tool, it’s about the results: the pushing of boundaries, the new twists, the endless creative ways to use the dang things! For instance-just today two new super stencil projects came my way that offer all of those things-and they both just happened to be floor projects that are original, inspiring and oh so cool!

Mandi from Vintage Revivals is a good friend to Royal Design Studio stencils, and we “love her guts”-and her amazing eye and ingenious projects. So much so, that when she asked us for a custom, super-sized houndstooth pattern stencil for a floor project she was doing we said “how big?”

Of course, Mandi didn’t just stencil it. She stenciled it with an ombre effect, with colors gradating from light to dark to light again. How cool is that!? Mandi dishes on all the rug stencil details here!

So, thanks to Mandi, you can now houndstooth (is that a verb?) your own floor-or wall with this new large graphic stencil from Royal Design Studio.

To make matters even better, I have ANOTHER cool floor idea for you courtesy of Tara at Dump Your Frump (how fun is THAT thought?) Tara had the awesome idea to stencil on a plain stone tile floor with our Allover Moroccan Arches pattern. Yes, you can do this-you just need to make sure that the surface is clean and “toothy” (meaning it will allow the paint to bond) and that you finish it off with an appropriate topcoat.

I have stenciled before on “unsealed” stone, like travertine, and its a great look. Well I don’t need to tell you because you can SEE it here. If you use a more translucent paint medium, like a gel stain or fluid acrylic, the color will penetrate and you can still see the texture of the stone. I love the bold color choice here though. The frump had definitely been dumped from THIS powder bath.
Thanks for the floor show, Mandi and Tara!


 Copyright © Designamour