January 31st, 2012
Pinning: Body of Work
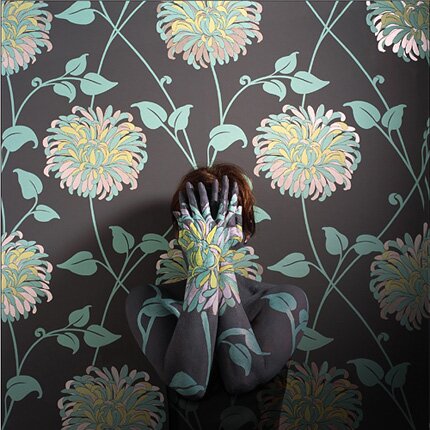
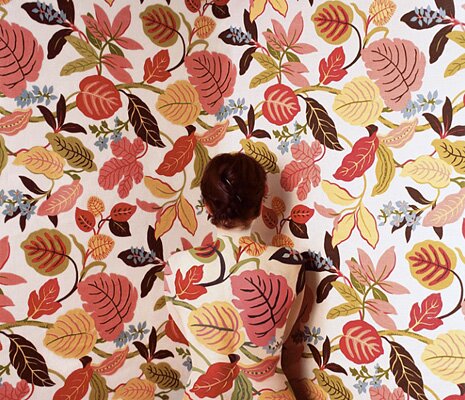
Cecelia Paredes is a performance artist who paints her body in a way that she becomes an indivisible extension of her subject matter: in this case natural forms represented in organic wallpaper patterns.

Source: trendland.net via Melanie on Pinterest
The result is a body of work that speaks for itself. Enjoy!
January 29th, 2012
Stencil Giveaway Winner!
And we have a winner!! First and foremost I would like to thank each and every ALL of you who entered our lastest stencil giveaway for taking the time to visit our stencil website, comment, tweet, share on Facebook, and even pin on Pinterest for the chance to win our $75 stencil shopping spree from Royal Design Studio!! I was thrilled to see those lovely comments keep coming-all the way up to 486.
Second, I would like to thank The Nester for hosting this amazing sponsored giveway on her blog and allowing Royal Design Studio to participate. I feel honored to be included with the other wonderful companies and their yummy products.
Alas, we can only pick one winner an that is
Kalyana left comment number 289, which was randomly chosen from all 486 entries by random.org.
I can’t wait to see which one of our Moroccan stencils that Kalyana picks for her bathroom wall. Let’s hope she shares a picture with us!
SUPER BIG Thank you again going out to The Nester and all of you who entered!
January 24th, 2012
Stencil Giveaway: Nester-style
We had SUCH a wonderful response to our last giveaway we did in conjunction with the amazing blog, The Nesting Place, we r totally down with the opportunity to do it AGAIN! Now that the winter doldrums have set in it’s the perfect time to pick a Royal Design Studio wall stencil pattern that you would like to win then GO FOR IT!
Here’s the scoop!
PRIZE: We are giving away a $75 Shopping Spree at Royal Design Studio along with free shipping to the continental U.S. That’s $75 to buy anything your heart desires on our website, including stencils, stencil cremes, and stencil supplies. We have hundreds of stencil patterns to choose from. Such as….
There are SIX different ways to enter!
1) Visit our Royal Design Studio website, take a look around and just simply leave a comment on our blog post here on your favorite stencil and/or products that you’d pick up during your shopping spree!
The rest involve Facebook, Twitter and/or your blog to give you a chance at additional comment entries!
2) Like us on our Facebook Fan page and leave a comment telling us you did;
3) Follow us on Twitter and leave a comment telling us you did;
4) Follow me on Pinterest, pin the image above to one of your own pin boards, and leave a comment telling us you did;
If you are already a fan or follow us, do let us know as well. We love our fans and followers so that counts!
This counts as four entries. You can stop at 1, 2, 3, or 4, but why not stack the stencil winning deck, so to speak. You can also:
5) Facebook about our giveaway, and leave a comment here, telling us you did;
6) Tweet about our giveaway, and leave a comment here, telling us you did;
Just make sure that for whatever you do, leave us a SEPARATE comment so you get those additional chances. Do one or do all six — it’s your choice! We think it’s always a little more fun to spread the word and up the ante! Let the entries begin!!!
Again, we would like to thank The Nesting Place for helping host the Giveaway Day and offering us a chance to participate– She’s featuring all of her sponsors, so do be sure to go there for more giveaways. We’re so happy to be featured along with some very cool companies. Thanks, Nester!
…and Thank You, Everyone! You have until Midnight on Friday, January 27, to get all your comments in. We choose a Winner via Random.org and their name will be announced by Saturday morning, January 28. Best of luck!
January 20th, 2012
Sneak Peek: New Stencil Site
I have something to share with you.
This something has me feeling excited, stressed, creative, anxious, thrilled.
This something keeps me focused, overwhelmed, engaged, up at night.
This something can’t happen soon enough. This something seems like a project without end.
This something is something that I hope will thrill you. This something is something that I hope doesn’t kill me.
Website (and blog!) redesigns. Coming soon. Fingers crossed.
January 17th, 2012
Pinning: Golden Touch
A random Pinterest search yesterday brought me to the most stunning, moody, sensuous painting of a woman with gold flecked hair.

Source: jeanniejeannie.com via Melanie on Pinterest
Of course I wanted to see more…don’t you! Clicking through to the original source led me to an exceptional design blog Jeannie Jeannie, and article on artist Brad Kunkle, who embellishes his oil painting of women with real gold and silver leaf to not only add a symbolic element, but to also allow light to play across the painting. The effect is amazing…enchanting… mesmerizing. Spend a few minutes, or much more, on his website enjoying the light….

Source: jeanniejeannie.com via Melanie on Pinterest

Source: jeanniejeannie.com via Melanie on Pinterest
January 16th, 2012
Pinning! Furniture Stenciling
There is so much that I enjoy with sharing this furniture stenciling pin!
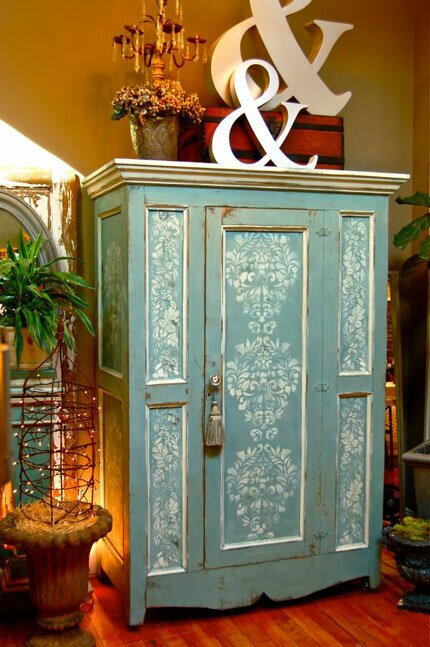
It’s a superb piece by good friend Debbie Hayes of Faux Design Studio and the Faux Plus Design blog. It uses Annie Sloan Chalk Paint (Duck Egg Blue and Old White), AND Deb incorporated two of my most favoritist stencils from Royal Design Studio: the ever popular and classic Fabric Damask and Brocade Border. It all comes together beautifully in Deb’s brand new studio in Greensboro, NC, where she’ll be hosting an open house this coming Wednesday from 4 to 6:30 pm:
FAUX DESIGN STUDIO, inc
1100 Revolution Mill Drive, Studio 8, Greensboro, NC
336.707.6945
January 13th, 2012
Pinning! Color Crush
Introducing your newest addiction. Design Seeds is like color lover’s crack. Color pusher Jessica has organized her beautifully created palettes by thoughtful themes including mineral, summer, vintage, edible. Don’t know about you but I could just eat this up all day long! Link to this palette on Design-Seeds.

Source: design-seeds.com via Melanie on Pinterest
January 12th, 2012
Pinning! Chinoiserie Whimsy
Pinterest pin of the day! Chinoiserie is the 18th century European interpretation of Chinese ornament. It is one of my favorite aesthetic styles, but can be quite formal looking. I love the scale and whimsical quality of this one! You?

Source: eclecticrevisited.wordpress.com via Melanie on Pinterest
January 10th, 2012
Floorcloth Fancy
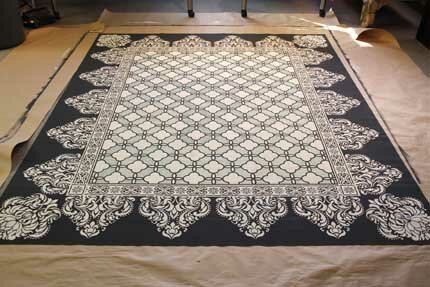
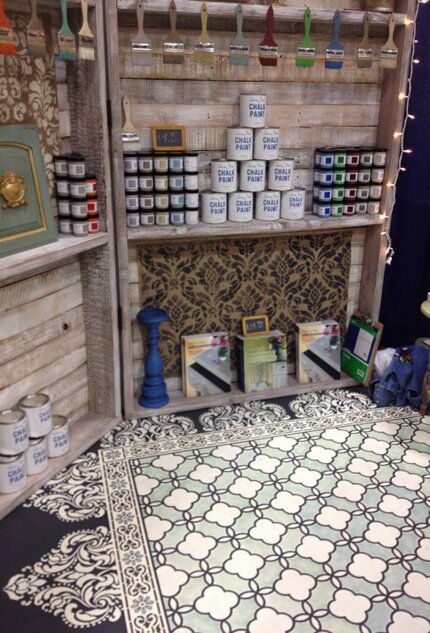
I created a stenciled vinyl floorcloth using Annie Sloan Chalk Paint recently for a booth display that got rave reviews so thought it would make a good step-by-step tutorial to share!
Stenciled floorcloths (sometimes referred to as oil cloths or floor canvases) have a long history of use in both England and the United States. Often made from recycled canvas ship sails, painted and stenciled floorcloths offered a less expensive and more hygienic alternative to carpeting and were used extensively in homes both grand and common prior to the invention of linoleum. Most modern day floorcloths are still made from heavy canvas, which requires priming, stretching, and hemming. As I was looking for a quick and easy alternative-fast-I turned to another modern option: flooring sheet vinyl!
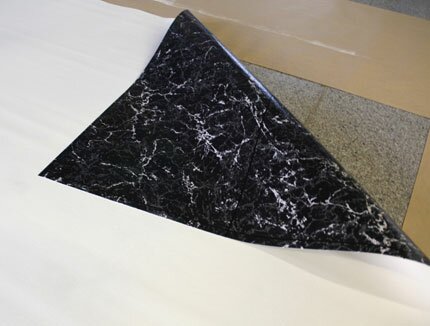
Now, as you know, sheet vinyl comes in many different colors and patterns including brick, tile, and more. Because I wanted a nice smooth surface and blank canvas for my floorcloth, I chose a roll of sheet vinyl that had a smooth, felt-type backing and painted on THE BACK side. NOTE! I just purchased a very inexpensive, thin vinyl that was pre-cut and prepackaged for my trade show floor, but if you are doing this for yourself I highly recommend that you go with a much thicker, harder, and better quality vinyl.
After applying a coat of white primer and allowing that to dry, I rolled on two coats of Graphite Chalk Paint. Now, you could use any latex and/or acrylic paint for a floorcloth. I happened to choose Chalk Paint because
- I love it, and
- I was showcasing Chalk Paint in my booth!
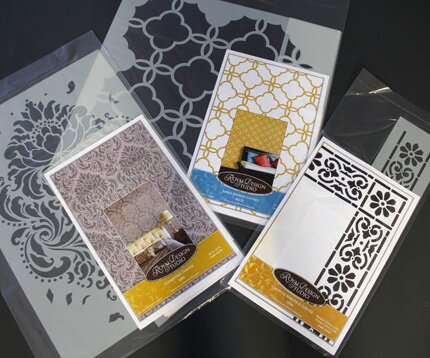
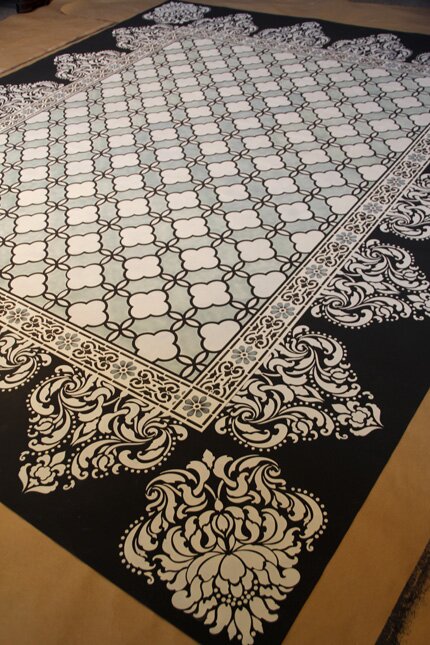
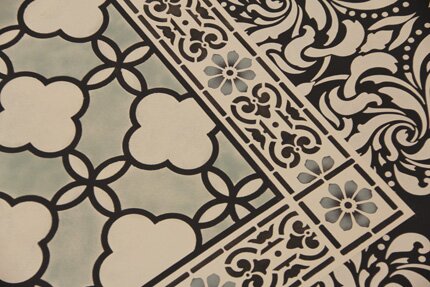
I found it super easy to use on this large scale and quite ideal for stenciling! I LOVE combining complimentary stencil patterns on a project and this large 8′ x 10′ surface provided lots of space to be creative! I decided that I would use our Large Eastern Lattice stencil as the centerpiece and frame it with the Classical Border and Corner stencil. For a lacy scalloped edge, I chose the Florentine Damask stencil, with plans to just have the bottom portion of it coming off the linear border. When picking patterns to go together, I generally look for ones that offer a variety of scale but also contain unifying elements. To my eye, the lattice pattern has a petal effect that is echoed in the border pattern. The border pattern has some small dots in it which are echoed in the damask pattern. Works for me!
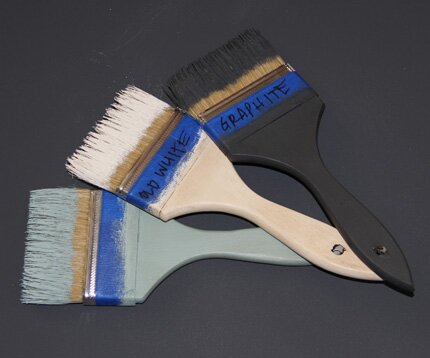
For a color palette, I chose Old White and Duck Egg Blue over the Graphite. I think that the addition of the Graphite with these soft, classic colors adds a little big of a fresh modern edge.
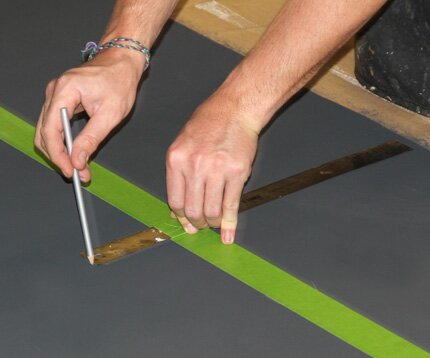
The first step was to determine where to place the Classical Border and Corner “frame”. Since the Eastern Lattice stencil is a symmetrical allover pattern, I knew that that could be repeated as much or as little as needed, but I HAD to determine how much space to leave at the edge for my Florentine Damask “lace edge” on my 8′ by 10′ floorcloth. We then measured 14.5″ in from the edge, made tick marks with a chalk pencil and ran tape on the outside of those marks. Then we measured in 4″ from there (enough to accomodate the border design and ran tape on the inside of those marks to leave a 4″ opening between the strips of tape.
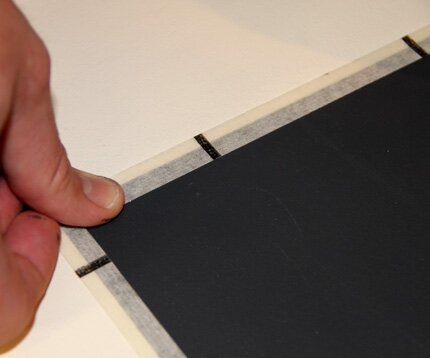
We burnished the tape well and rolled on two coats of Old White Chalk Paint with a short-nap 4″ roller (not shown). When dry, we used a translucent tape to overlap just inside the frame. This was placed at roughly the width of the lines of the lattice stencil to preserve a nice black outline there. If you don’t have a similar tape you could mark lines and use blue or green painter’s tape.
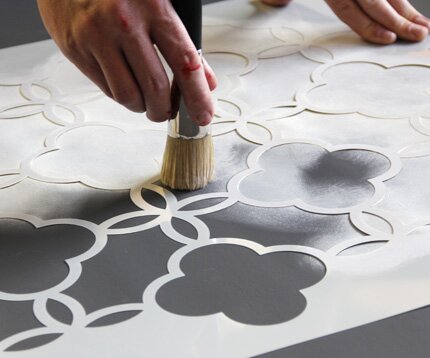
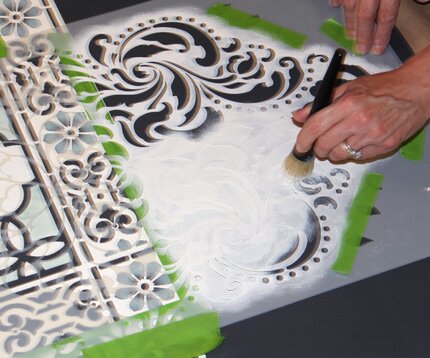
Now to the stenciling! We measured to locate the center of our large inner rectangle and centered one of the cloverleaf elements over it. This ensures that your symmetrical pattern will end the same at opposite edges. I used our new larger 2″ stencil brush to stencil the whole design first with Old White Chalk Paint. The Chalk Paint covers very well, but it did take two passes to get full coverage with the white. Fortunately, the Chalk Paint dries SO quickly that you can go immediately back over it. This isn’t possible with latex paint-you must let the first coat dry so you don’t lift it off by going back over it too quickly. Of course, I used a dry-brush method with the brush, meaning I dipped just the tips of the bristles into the paint and offload a bit onto paper towels before stenciling.
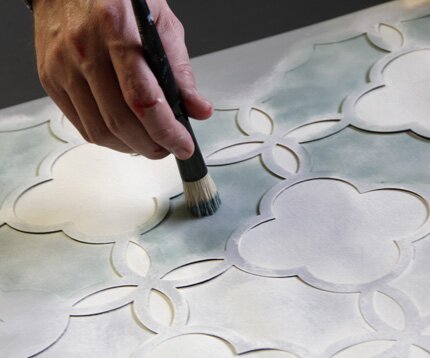
The Duck Egg Blue color was then stenciled right over the Old White, JUST in selected areas of the design. In order to avoid the hassle of taping off the pattern to isolate this area, I simply switched to a smaller, 3/4″ brush which allows for more control. You just have to be careful as you near the edges to keep the bristles from creeping in the areas you want to remain white.
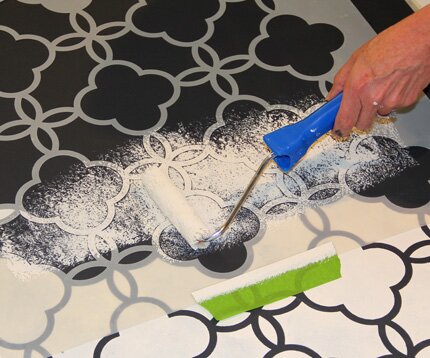
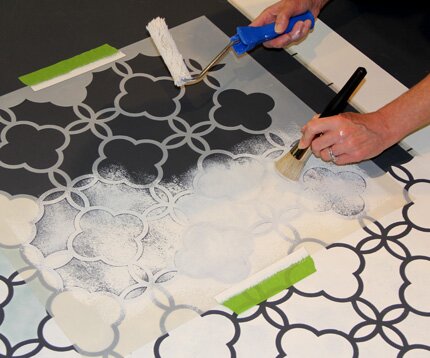
After a few repeats like THAT I decided to try for a speedier method. The dry brushed method looked fabulous, but I was in a time crunch, as always! I switched to a roller/brush combo that worked quite well with the Chalk Paint! After offloading the roller slightly (again on paper towels) I used a light pressure to roll the wet paint onto a portion of the stencil repeat.
Then, while the paint was still wet, I used the brush to smooth and swirl it out on the surface for the first layer. This was definitely faster, but I did have some paint seepage here and there which I touched up easily with Graphite at the end. Once I switched to this technique I just continued on doing all the white and then went back and replaced the stencil to apply the blue.
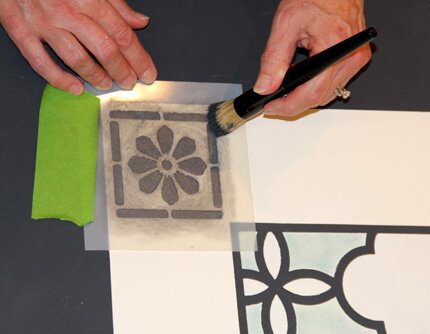
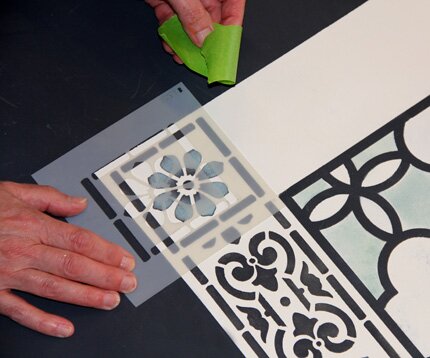
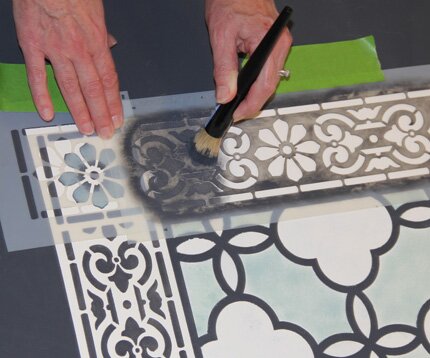
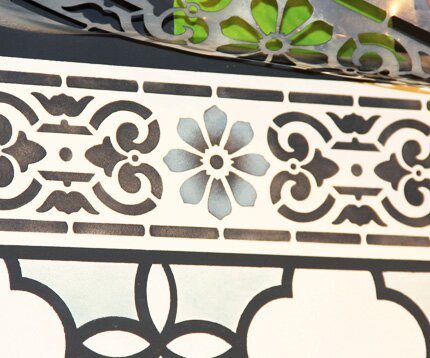
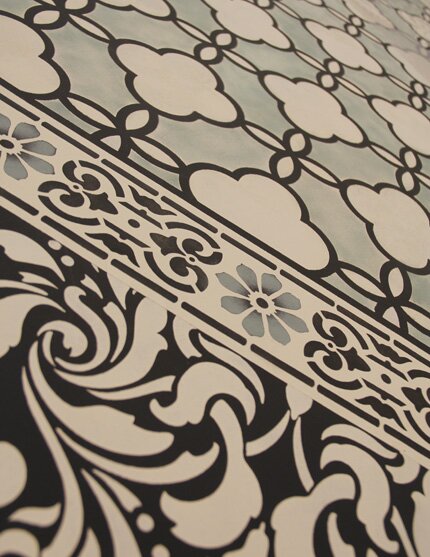
Next up! The stenciled border. The Classical Border and Corner stencil is perfect for this because it comes with a corner tile piece that gets stenciled in the corners and the border design can simply run in between. These were visually centered in the corner area and stenciled in the Graphite Chalk Paint again.
To finish off the border with a nice clean edge, simply use the edge of the corner piece to mask off and protect the area, leaving a nice open space that mimics the stencil “bridges”.
The border design was centered in the space between the corners (simply mark the center point and place a central element right over it) and then stencil with the repeat until you hit the corner. This way, your design will naturally end at the same point on opposite corners.
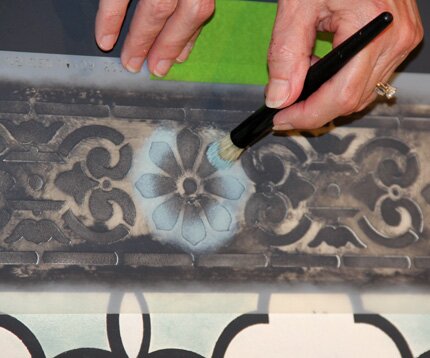
I wanted to bring a bit of the Duck Egg Blue Chalk Paint color into the border pattern so used a dry-brush technique to shade it just around the outer edges of the flower petals.
Voila!
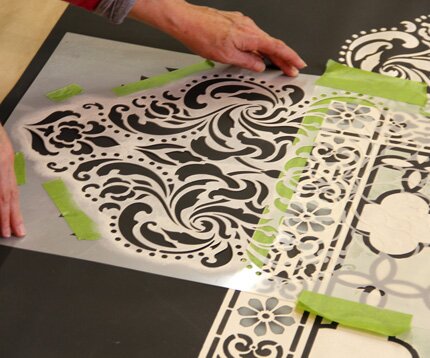
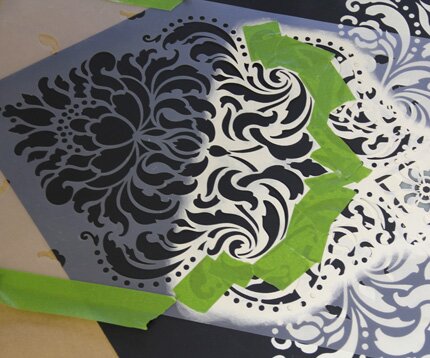
For the lacy edge, I positioned the Florentine Damask stencil at the same point each time. Notice that tape was placed over the border area to protect it from having Old White paint creeping into the black parts of that design.
I began by stenciling on either side of the corner first and dry-brushed on two quick layers of Old White Chalk Paint. Once I had my corners done, I spaced the damask repeats out equally along each side between the corners. On the long edges I was able to stencil 5 repeats total, and 4 repeats total along the short edges. How much space you will have will depend on the size of your floorcloth and it’s best to measure plot it out on paper beforehand if you are doing a different size than our 8′ x 10′.
I could have left the corners as is, but wanted to add a little more detail, so I flipped the stencil around and played with it till I found a nice “fit”. Then I isolated that area with painter’s tape and stenciled in the finishing touch!
Happiness! I love this combination of colors and patterns, which would also look super fab on a ceiling or tablecloth, I think. To protect my lovely floorcloth I used two thin coats of Annie Sloan Lacquer. This is a matte, water-borne finish that is designed to work with the Chalk Paint-particularly over concrete floor surfaces. It is very thin, and penetrates the paint surface to provide a highly durable finish.
It was quite dirty after being walked on at the Home Show, and I was able to clean it up nicely with a Mr. Clean Magic Eraser without any ill effects to the paint finish! Unfortunately the cheap, thin vinyl did get some tears in it here and there. Like I said above….buy good, thick, vinyl-or paint directly on your floor or traditional floorcloth canvas-available here! For another cool idea for a hand painted vinyl floorcloth, check out this Pinterest pin!
I hope you enjoyed this floorcloth idea and tutorial! Let me know….
January 5th, 2012
Chalk Paint Giveaway Winner!
And the winner of the Annie Sloan Chalk Paint gift basket is……
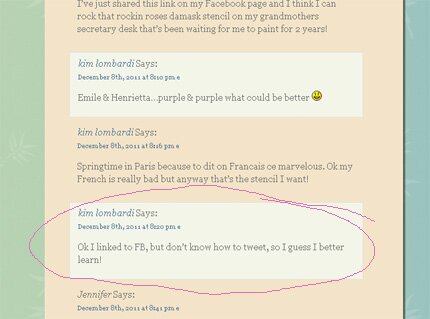
Kim Lombardi. Kim left comment #7 and ALSO left two other bonus comments including a comment about which Royal Design Studio stencil she would like-our amazing Springtime in Paris Typography stencil. Way to wish big! Kim, you WIN and are also entered in this weekends drawing to attend the Annie Sloan North American Tour date of your choice.
Thank you all for your comments!! I really enjoyed reading your fav Chalk Paint color combinations and stencil choices.













 Copyright © Designamour